

 July 14, 2010
In my previous post (Part 1, see also Part 3 ) about FileMaker MailChimp integration, I discussed the issues around using FileMaker as your main bulk email program, problems with WYSIWYG mail creation, getting hit with a spammer designation from your ISP, issues with using simple HTML to allow all email clients the benefit of reading the message correctly etc.
MailChimp is a web service that offers the ability to create campaigns, maintain email lists, provide stats and signup forms and somehow they are able to do all this AND dodge being blacklisted for spamming. All good things in email marketing campaigns.
The Data Islands Dilemma

The problem of working between two system (FileMaker and MailChimp), is the issue of data islands. As soon as you create another data table of your email addresses, the records can start to drift apart. Changes made directly to MailChimp may not show up in your main system and vice versa. Using the techniques in the sample database, we hope to display an approach to keeping the two ‘data islands’ a little closer together.
Keeping the records in FileMaker and MailChimp in sync is the object of this demo. We are not attempting to replicate the complete MailChimp API, which is extensive. Using the basic technique described here, you could create campaigns and start your emails right in FileMaker. We are not trying to do that, but rather, show a set of fairly straightforward techniques to allow you to keep your two data sets of email address in sync.
The MailChimp API Methods we have chosen to support in this demo include: Subscribe and Unsubscribe from a List; Add/Edit/Delete Groups; Get info on Lists; Get info on Groups. We also built an Export script to send larger batches of email addresses to MailChimp. Using a batch export/import routine is the best approach to dealing with large numbers of subscribers.
Using the Web Viewer/Parsing method we described in Part 1 of this article is very useful, but to be honest it is a tad slow. You will probably only want to employ the technique to add a few new subscribers at a time. The batch export/import is going to be the preferred mode to get set up. Then to do simple updates, adding people to groups, taking them out of the list, or adding a few new members, this can all be done using the WebViewer/Parsing techniques.
Launch the Demo File

First off, click away from the annoying splash screen, but wait…before you do, note the links here:
1) Clicking the HomeBase Software, this will take you to the website and blog of the developer. If you get stuck and need a hand with your solution…
2) Email the developer with questions and suggestions
3) Detailed documentation link. You are already reading this so, you probably don’t need the link, but on the other hand if you open the file six months from now and wonder what is going on, this could come in handy.
OK, now click the close button.
The list of email addresses

The main page is a fairly standard set of names and addresses (all bogus, generated by the fine folks at FakeNameGenerator.com)
Detail view of the People record

We will come back to this screen later, when we have done with the setup, I just wanted to let you know it was here. This is where most of the work will be done.
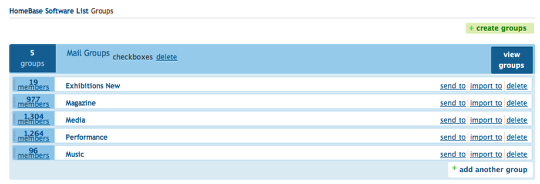
Groups list

These Groups correspond to Groups you will be creating on MailChimp. Adding Groups to a list give you the benefit of being able to send batch mail to sub-categories of your entire list.
The Group status field will show you if you have already added the Group to MailChimp. Don’t do anything in this layout quite yet, wait until you have completed the Settings steps which follow.
Settings layout

To get the MailChimp Global API from MailChimp,
In a web browser, open MailChimp, login, and go to the Global API page.
MailChimp login

Login to your account. If you don’t have one yet, set up a free demo account.
Go to API Keys and Info page

Copy the API key and switch back to FileMaker and paste it into the MailChimp Global API key field on the Settings layout of the demo file.

1) Paste in your MailChimp Global API key into the appropriate field
2) Click the Get List API button to get the Mailing List API key.
Note that in MailChimp, it is possible to have multiple mailing lists. We are assuming there is only one and we intend to employ Groups to handle sub-categories of People to send to, rather than having them in different Lists. If you want to do things different, you have to revise these scripts to handle multiple List names.
List API is retrieved into FileMaker

Once your API for the List is returned, you can move on and add your own Groups.
List in MailChimp

This web page shows the corresponding List in MailChimp. If you click the settings button, you can go to a screen that displays the List API.
Click on Groups in MailChimp to see the list of Groups created within this List.
MailChimp – List view – View Groups button

Click View Groups to view the Groups list.
Groups in MailChimp

Note that these groups already have members, because I did my import before. Your groups should not have any members at this point.
Groups in FileMaker

Clicking the middle yellow button (it turns blue to indicate that you are on the selected layout) will take you to a Groups list. The buttons here operate as you might expect, Adding, Deleting and Updating the Groups. It is good idea to create and tag People into Groups before uploading the full list to MailChimp.
People Layout – working with People and Group Tags

Find Groups and Tag Groups popup and buttons
Find Groups and Tag Groups

Find Groups
Click into the field to the right of the ‘Find Group’ text to see a popup list of the groups, with their ID number. If you have FileMaker 11, selecting one of these items will result in a search for that particular group. If you are in an earlier version, simply select a group and click the small ‘go’ button beside the field.
Tag Groups
The same approach works for Tag to Group. Find a selection of records and then select a group to tag your Found Set to. Click the Go button and it will loop through and add that Group tag to your list. Ideally this would have some error checking to prevent you from adding to a group twice, but, hey, this is just a demo right?
Mailing List Hygiene

MailChimp is fussy about what you send it in terms of email addresses. It is a good idea to clear duplicates and bad email addresses before running the Export for MailChimp routine.
Finding Bad Email Addresses

There is a Custom Function that checks for email validity. It doesn’t do a domain name search, but checks for top level domains. If it is causing false positives, please review the list in the Custom Function called “IsValidEmail”. This came from www.briandunning.com.
Export for MailChimp

So now you have your data ready to go. You have tagged people to Groups, cleaned up duplicate and bad addresses and you want to get rolling with MailChimp. Click the Export for MailChimp button.
First chance to bail out…

You are warned that this is a relatively slow process. The slowness is caused by turning the portal list of Groups into a comma delineated field for import into MailChimp.
Found Set or All?

In this case, for speed, I am selecting ‘Found Set’, but you will probably select ‘All’ for a full export.
Hygiene check runs

The Export script has screened for bad addresses, and notes that one address was rejected, meaning that only 24 out of my 25 records is going to be exported. If I had cleaned up before, this would not be happening, but then I wouldn’t be able to demonstrate this happening for you.
Processing…

If you have FileMaker 11, you will see a graph refreshing periodically to give the user an update on how things are progressing. If you have FM 10 or less, you will just see a flashing screen.
List Exported

File name given for the exported file, saved to your desktop. Details listed about dropped addresses.
FIle on Desktop

File Contents

File Export is a text file, ready to import into MailChimp. Note that the Groups are listed in the last field with commas separating them. This allows MailChimp to import them directly into your Groups in MailChimp. Note that these Groups were in a portal in FileMaker. That is what was slow about the export, moving them from an up-down format to a sideways format.
Back in FileMaker, MailChimp Status has been updated and the Groups Summary is filled in…

Over in MailChimp, import the list

Under ‘Lists’ tab, click ‘Import’ link on your List.
Select ‘Import from my computer’

Click the ‘Upload File’ button.
Click the ‘browse’ button to view a file on your computer

Select file from Desktop – click ‘OK’

Click ‘Import List’ button

Match up fields with the appropriate MailChimp field names

Click on each column head and select the field you are importing into, click ‘ok’ to move to the next field.
Click ‘all done’ to start import

Wait a while as MailChimp reviews the upload. Seriously, wait a while. If you thought my export was slow, wait until you try their import…
In the end, your group of email addresses should be imported, complete with Groups assigned.
Back in FileMaker again, Customer updates email address or Group info.

Now that you have your addresses in FileMaker and MailChimp, you can keep using FileMaker to do what it does well, keep track of your interactions with your customers and let MailChimp handle the bulk emailing chores.
If a customer tells you they have a new email address, click the Unsubscribe on the old address, enter the new address and the click Subscribe. Their address will be updated in MailChimp, without the need for a complete reupload of all the addresses.
Similarly, if you add them to a new Mail Group, you can Unsusbscribe and re-subscribe them to the list, with the new Groups listed.
Download Demo File

Give it a whirl and send me any comments or feedback.
Update: Part 3 of this topic covers using the Update method from MailChimp’s API to further refine the integration between the two systems.
Related Articles:
MailChimp Integration with FileMaker Pro – Part 1 of 4
FileMaker MailChimp Integration – Part 3 of 4
MailChimp Integration with FileMaker Pro 12 – Part 4 of 4
Related Articles
Digital Fusion: Sending Email from FileMaker Using Mandrill


Hmm…this is interesting. Have you found a way to do the same with Constant Contact?
I haven’t explored Constant Contact fully yet, although another one of my clients has talked about wanting this as well, so I may get to it sooner or later.
constantcontact.com‘s documentation for their API is here.
From a brief scan of their API docs, it sounds like you could do something similar, although it does not appear to be quite as streamlined. MailChimp allows everything to be done using GET commands. (ie put everything in a URL and throw it at their server, get back JSON or XML). It looks like Constant Contact is mainly using POST commands. You might need to run this off FileMaker Server and use PHP to send and receive the interchange between FileMaker and Constant Contact. Another approach might be to employ one of the plugins that can do HTTP POST commands, such as Scodigo’s SmartPill ($89 single user license) or 360Work’s ScriptMaster, (free) might be required.
A reminder of the difference (I forgot exactly as well) between GET and POST is:
Source
If I get to working on this I will post an update here or add a new blog entry.
Thanks for the in-depth explanation. This is most helpful information – specifically the difference between “Get” & “Post.” If I could afford you, I’d hire you on the spot.
If you are not deeply invested in Constant Contact, you may want to consider switching to MailChimp, simply for the ease of integration that MailChimp offers with FileMaker. It would involve moving your list over, redoing the Groups and changing whatever mail signup form you have out there. MailChimp does all these things beautifully. I think the monthly costs are pretty similar.
http://www.constantcontact.com/pricing/email-marketing.jsp
http://www.mailchimp.com/pricing/view-all
These blog posts are excellent. We have a couple of solutions which use the Dacons mail.it plug-in and do lots of HTML emailing, but it’s using the raw HTML code. We’ve automated some of the work, but still there’s no WYSIWYG for design. We also use MailChimp and recommend it to our customers, so this look to be a great solution… Congratulations!
WYSIWYG is what is missing in FileMaker. You can fake it using the Web Viewer for previews of your HTML, but it is not the same as editing in a WYSIWYG view.
The only flaw I can see in this is, that if you unsubscribe a person in MC you lose all the data from that person (opened which emails, clicked through to what links etc…) so you start from scratch. If you just update the email address in MC it holds this info. Not ideal but it depends on what information you want.
Good call. This was pointed out by another offline commenter, so I was looking at implementing the listUpdateMember method from the MailChimp API. This may solve this issue. I may not get around to this right away.
This is VERY exciting! I can’t wait to start using it! Thanks for figuring this out for us not-as-techy-as-you types!
I signed up for free account added aPI key to the sample DB and get this back
error”:”Invalid Mailchimp API Key: (with my key in this spot) . You are accessing the wrong datacenter – your client library may not properly support our datacenter mapping scheme.
You may need to include the extension on the API to get to the right data center. In my case the extension was “-us1”. Check on your API key to make sure you have the full length of the key.
Yep I copied the whole key extension -us2
I can email it to here it is so you can try it. I’ll just get a new one once this one works
f2351cd209f3e94b757c8fd71684ac9d-us2
or”:”Invalid Mailchimp API Key: f2351cd209f3e94b757c8fd71684ac9d-us2 . You are accessing the wrong datacenter – your client library may not properly support our datacenter mapping scheme.
I tried your key as well and it doesn’t work on my end either. Try generating a fresh key on MailChimp (go to the screen where you copied the original API and delete it, then generate a fresh one. Then update the ‘Get List API’ as well.
stil no joy
or”:”Invalid Mailchimp API Key: f2351cd209f3e94b757c8fd71684ac9d-us2 . You are accessing the wrong datacenter – your client library may not properly support our datacenter mapping scheme.
hmm..I am having no luck with your key either. And yet, if I revert to my key, the methods all seems to work fine. My API key references ‘-us1’. It seems that ‘us-2’ uses a slightly different setup. After you have added at least one list and some groups within MailChimp, try entering this into a web browser to get your lists: http://api.mailchimp.com/1.2/?method=lists&apikey=f2351cd209f3e94b757c8fd71684ac9d-us2 This will fail, but it will show you the methods that work on this server. You will probably have to modify some of the scripts to get this to work. I didn’t realize MailChimp was maintaining more than one API system. It looks like this is the older version of the API, version 1.1. If you look at the documentation, you will see that some of the stuff listed on your server has been deprecated in the 1.2 documentation. You could try to get support at MailChimp to set you up on the us-1 server to avoid reworking these query strings. Sorry I can’t be of more assistance.
Woops looks like my post did not make it up here? I have modified the scripts in the demo file so they grab the server from the api key and use it according to 1.2 API I’ll send you the file if you contact me.
Hello Dan, thanks for your step by step explanation.
i cannot seem to work out the update process in mailchimp. the PAI key is invalid. i am using FMP12.
As for the group, the script is stuck and does not update or add, or delete anything
Thanks in adavnce
I like the auto responder function of Omnistar Mailer