
 July 2, 2012
This is an idea I had about creating static map overlays in FileMaker Pro.
The gist of it is to create a base graphic map using a program like Photoshop and then add a number of transparent overlays to the map. Save the base map and overlay layers as transparent PNG files and import them into FileMaker Pro. Once in FileMaker Pro, build a solution that sends each overlay graphic to a different layer of a repeating container field. Set the container fields to be transparent, so that each graphic shows through the one below it.
I came up with this idea, because I ski regularly at a place called Sun Peaks Resort in BC. The resort is great and I love skiing there, but I wished their web site had a more visual display of the hill’s nightly grooming maps, instead of just a text list of the runs. I can remember a visual image easier than a list of names, when I am skiing. If it is a powder day you avoid the groomers, if the conditions are challenging, you head for them. OK, I will be honest, usually I head for the groomers anyway, I love the feel of fresh corduroy in the morning.
It occurred to me that I could build a database in FileMaker Pro to convert the text-based list of runs, into a more visual map to display the days preferred runs.
This concept of a static map with transparent overlays could be adapted for situations such as:
- tour bus seating maps
- airplane seating reservation maps
- restaurant table bookings
- reserved theatre seating
Map Overlays Demo File: Download Demo file here
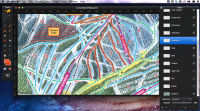
In Photoshop or other graphics program, create your underlying map and then generate layers for each overlay
To create my base map and overlay files, I used Pixelmator, ($14.99 through the App Store) a great Macintosh Photoshop substitute. First I cropped the larger map from the resort’s web site into smaller chunks. Then I drew a transparent orange line for each run as a separate layer. I set the opacity for each layer to 60%. Finally I exported all the layers as PNG files. The PNG file format will display the image with no background as well as displaying the opacity at less than 100%.
When exporting the PNG files, be sure to include a transparent background of the same size as the underlying map so that the overlay will position appropriately.
Setup in the Demo file
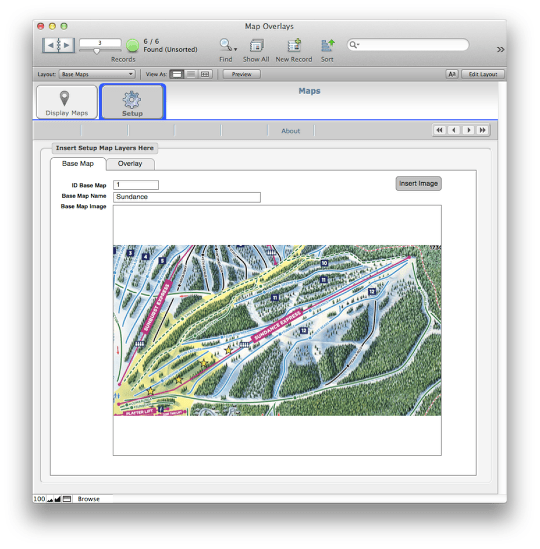
In the demo file, import each of the underlying maps. The demo has the ability to keep track of as many underlying maps and overlays as required. Give each underlying map a name in the Map Name field.
Import and name PNG Overlays

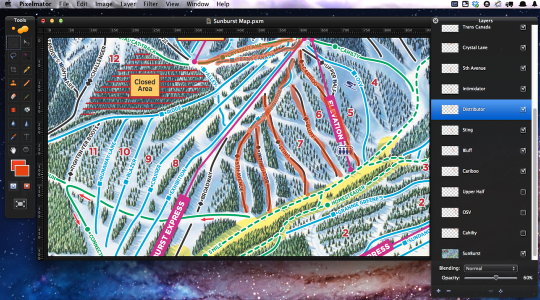
Next import the individual overlay graphics and name them with the relevant run name. The little squiggly lines are the overlay graphics for each groomed ski run. Each one is the same size as the base map, but with a transparent background, they appear tiny.
Display Maps

In the Display Maps layout, you should see the Map generator.
- Clicking on the ‘Generate Maps’ button, top left, will create a fresh set of maps for each area for a particular date.
- In the top left area are the Date, Name of Underlying Map and the base map.
- In the right hand column are the list of Overlays. Clicking on the ‘Yes’ button beside each Overlay will add the overlay to the map.
Behind the Scenes: How it works

Switch to layout mode to view what is going on. Note that the container field holding the maps is overlaid a number of times. This isn’t just a blurry graphic, it is caused by stacking 20 overlay graphic container fields on top of the main base map container field.
Stacked container fields
1) Transparent Container Fields Stacked
If you click and drag the first container field in the stack a little bit down and to the right, you will see that it reveals a set of overlaid container fields, one for each of 20 possible layers. Actually up to 25 are possible in this solution, I got bored copying them. If more layers are needed, simply add duplicate the layer and modify the settings in the Inspector to display higher numbers of overlays. If you need more, then go into Define Fields and increase the number of Repetitions for the field “Overlay Images”.
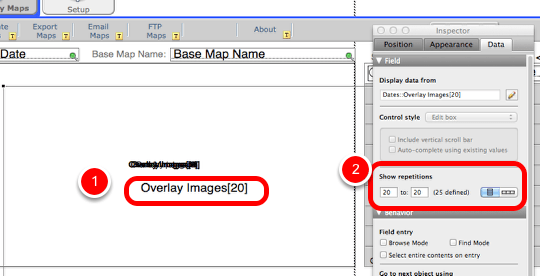
2) Show Repetitions
Clicking on the top field in the stack of overlaid container fields and then clicking on the Inspector palette, Data tab, you will see that the top field is set to Show Repetition 20 of 20. The field is a repeating field that can contain up to 25 occurrences. This number could be set higher if need be, just remember to add a container field for each occurrence you want to be able to display. There does not appear to be any limit or blurring of the images as you increase the number of overlays.
Set the fill of your container fields to be transparent

Another important part of this technique is to ensure that the container fields are set to transparent. Select the container fields and from the Fill pop up on the top bar, select the two overlapping squares. This is the transparent option so that the PNG files when inserted into the Container field, will not block the layers below.
Script Trigger to Toggle overlay on and off

In the overlays portal, the Status (Yes|No option) field to display an Overlay graphic layer has a script trigger attached to it OnObjectModify that runs a script that sets the repeating field to hold the overlay graphic.
Toggle Container Field to Hold Transparent Map Image

This script step sets the appropriate Portal Row Number to the Overlay Graphic layer. The variable $PortalRowNumber sets the overlay graphic to a particular repetition of the repeating field Overlay Images. That is if it is portal row 3, the graphic gets sent to Repetition 3 of the Repeating field.
Field Definition for the ‘Overlay Images’ field
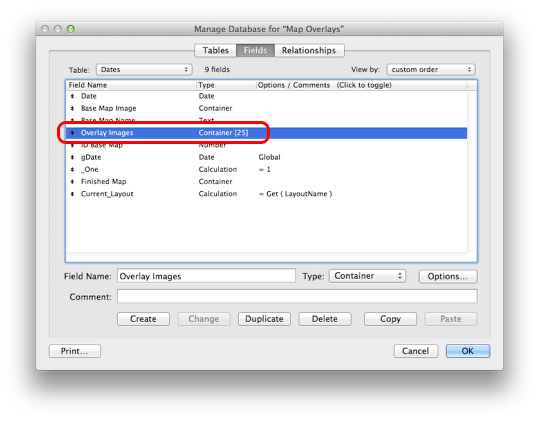
This field is defined as a Container field with 25 repetitions. No doubt there are other ways to achieve this overlay effect, but this seemed like a good use of FileMaker’s venerable Repeating Fields feature.
The demo file was created in FileMaker Pro 11, but there should be no reason it doesn’t work in FileMaker Pro 12. The database will also work in FileMaker Go although the interface has not been optimized for a small screen.
That’s it, more fun with FileMaker. Let me know if you found this technique useful and if you end up implementing it in a solution.
Related Articles:
Creating Google Cluster Maps from FileMaker
FileMaker and Image Maps in a Web Viewer


I think this is very cool. I always appreciate when people go outside of the box and do more with FileMaker.
Not sure I can see a use-case for it yet, though. Also, did you look at GoDraw? I don’t remember if it can do more layers or not, though.
Another possible use that occurred to me was for product catalogues. One could use this technique to quickly add standardized overlays over product shots. Tags like: 10% discount, Intel Inside, Christmas Special etc.
http://www.geistinteractive.com/godraw/overview/
I did look at GoDraw. Looks useful, but for different purposes.