
 August 8, 2012
I recently saw mention of an app for the Mac that helps you find your photos lost in your email attachments. It is called Lost Photos and sells for $2.99 in the App Store. Although the price is a bargain and not to take the thunder of out of this app, which does some other things as well, but you can retrieve your lost photos very simply with the existing tools in the Finder and make it easily accessible by turning your search into a Smart Search for ZERO dollars. Read on.
Locate your Home Folder

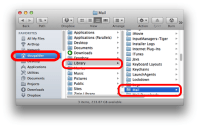
Go to your Home folder (the one with the little Home icon), then click on the Library folder. Yours will be named something different than mine. Look for the icon.
Select your Home Folder: Library Folder: Mail Folder

From the Home folder, click Library and then Mail.
With the Mail folder selected, perform a Find

Select Find from the File Menu or type Command F
Enter a Search Criteria

- Enter your search in the field called ‘Search for’. In this case, I am going to enter ‘.jpg’. I could also do a search for ‘.png’ or ‘.gif. etc. I will go into more on that below
- Make sure that the Mail folder is still selected in the ‘Search:’ area at the top of the window. This determines where on your hard drive the search will run. If it is not selected, go back to the previous step and start again.
Search Results for JPG files

A variety of files should start to populate the search results area.
Change the Finder View to ‘Show Items as Icons’

Previews for the files will display at the top of the Finder window

When you click on a file in the list that has been retrieved, a thumbnail view of the photo or image will display in the top area of the window.
Sort by Kind of File

From the Sort by popup, select “Kind”. This will allow you to view your .jpg files grouped together. You may have to scroll a bit to find them, but once you find them, they should all be all in one area of the list.
Click on an Image, view the thumbnail above

Press the Space bar to view images

Pressing the space bar on your keyboard will display the images in a new window at their full size. This will save squinting to see what is in the photos.
Alternate approach: Expand the thumbnail view to a larger area

Another approach to viewing the images larger is to expand the window and make the top area larger. The thumbnails will grow to almost full size.
The Forward and Backward Arrow Keys

Using the Left/Right or the Up/Down arrow keys, you can move quickly back and forth through the list of found images.
Full Screen Mode – ‘Save to iPhoto’ button

The whole point of the exercise is to retrieve your photos, so in Full Screen Mode, you can click on the icon to save any photo you want to keep in iPhoto. The forward and back arrow keys work in Full Screen Mode as well if you have selected all the images you want to view before entering Full Screen Mode. To get out of Full Screen Mode, tap the ESC key.
If you don’t like Full Screen Mode, you can always employ drag and drop from the list into your iPhoto library.
Save the Search for future reference and quick access

Click the ‘Save’ button to get back to this search quickly.
Give the search a name that you will remember

Click the ‘Add to Sidebar’ option to have the search show up as a Smart Folder in the left hand side of every window that you open in the Finder.
Smart Search Saved in Sidebar

Now, you can simply click on the icon and get back to the Search almost instantly.
Edit the Saved Search

Right clicking on the search allows you to modify your search criteria. Fortunately, Spotlight Searches support Boolean searching.
Add an ‘OR’ to search on multiple search terms

- Add multiple ‘OR’ items to fine tune the image search
- Note that the modified search is returning png, gif and jpg files.
- Once you have completed modifying your search, you can get back to it quickly by simply clicking on the Smart Search in the Toolbar.
Refining the Search

Note that I changed my search to be more precise, swapping it to ‘Name’ matches ‘.jpg OR .png OR .gif.’ This eliminated Mail messages and PDFs with the word ‘.jpg’ in them.
Also, Spotlight seems to be particular about employing capitalization in the word OR.
You can even add a criteria to look for files over a certain size, to eliminate low quality images.
More Help on Refining Searches

The Help menu in the Finder offers more tips on customizing Spotlight Searches.
Now back to finding those missing images.


Comments are closed.