
 April 14, 2015
2015-07-09 Update: In production use, this technique has proved problematic. It seems that the AppleScript Folder Action processes are not 100% reliable. In day-to-day use they seem to crash fairly regularly. I had thought that the issue could be resolved with a RAM upgrade, but having recently done that, we are still experiencing problems. Apparently Folder Actions are a known issue in OS X Yosemite
The workaround is to launch Activity Monitor (Utilities folder inside Applications folder) and look for processes highlighted in red. Select the process and click the small ‘x’ stop sign icon in the top left corner of the window. Click ‘Force Quit’ from the resulting dialog box. Once three processes are killed:
- Automator Runner
- Folder Actions Dispatcher
- ScriptMonitor
The import process will resume. I am disappointed that the Folder Actions processes are crashing and still looking for a better solution. Use this technique at your own risk. Results may vary.
A Macintosh computer, FileMaker Pro 13, a Fujitsu ScanSnap S1300i, Automator, Applescript, a Folder Action and FileMaker’s URL Scheme make a paperless solution for legal waivers a reality.
Since the advent of FileMaker Pro 12, my favorite database development tool has been great for building document management systems. These newer versions of FileMaker have much better handling of container fields, allowing developers to set up the storage for images and PDFs in a separate directory on the server. This keeps the main database file size smaller and easier to backup. With the advent of external storage, it is possible to relatively quickly add document management features to most FileMaker systems. FileMaker Pro 13’s improved URL Scheme makes life even better for developers wanting to run scripts from outside the database, including the ability to send script parameters.
I have a project where we are integrating waiver forms with a FileMaker customer and pass tracking database. In addition to an iPad-based sign-in form, there is still a need to be able to deal with paper forms, downloaded from the company’s web site and signed offsite by parents. The customer is a gym, and their desk space is a premium—squeezing a scanner in is going to be tough. There is space—just big enough for a small portable document scanner.
Developer Level: Intermediate/Advanced
Ingredients
- A recent Macintosh capable of running Mavericks or Yosemite OS X
- Automator – included software with all recent Macs
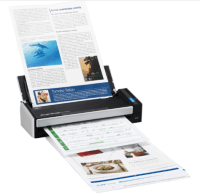
- A Fujitsu Scanner – I am using the ScanSnap S1300i. Note that this approach could work with any scanner that can be set up to scan to a folder. (Translation: any scanner)
- FileMaker Pro 13 (upgrade it to the latest version, which at the time of writing was 13.0v5)
- A working knowledge of FileMaker Pro
- Some knowledge of Automator and Script Editor
- An hour or so
See the Speed Test section below for an idea of how quick this routine runs with a fast scanner.
Fujitsu ScanSnap Scanner

Fujitsu arguably makes the best portable document scanners. I have one at home and love it. The sad fact is that Fujitsu, though they make many professional document scanners, do not support TWAIN, the industry standard API for software integration.
I went looking for FileMaker integration solutions and didn’t see anything that fit the bill (more on this below in the Other Approaches section).
TL;DNR Version

- Setup your Scanner to Scan to a Folder
- Create a Target Folder
- Set up a Profile to aim your Scanner Software at that Folder
- Set your Scanning File Quality Parameters
- Turn off Quick Menus
- Select the Scan to Folder Profile
- Paste the ‘Import Document’ Script into your FileMaker database
- Configure it to point at your Target Folder
- Set the Insert File to the appropriate container field in your database
- Open the Automator Script called ‘ScanSnap Folder Processing.workflow’
- Copy all the elements of the Automator script (Command A, Command C)
- In Automator, create a New Folder Action
- Paste the Automator script into the new Folder Action script
- Attach the script to your Target Folder
- In the AppleScript portion of the Automator Script
- Edit the FileMaker Version
- Edit the database name
- Edit the script name
- Test
- Scan some pages into the target folder
- Observe if the AppleScript is running
- Fix
- Read the full blog to understand what might have gone wrong
- Fix again
Speed Test

Setting a stop watch on the process of scanning, here is what I found. With the scanner set to single-sided pages and 150 dpi gray scale images, (average 115 kb sized files) it took:
- 46 seconds – to scan 10 pages through the scanner
- 52 seconds – have all the PDFs imported into a FileMaker container field.
As you can see, most of the time of the process is spent scanning. This may be faster or slower depending on your chosen document size, scanner speed, scanner settings and how fast your computer is running. The Automator Folder Action responds almost immediately to new items being scanned or dropped into it.

ScanSnap Settings – Setup a New Profile

ScanSnap Manager – Settings – Turn off ‘Use Quick Menu’

- Create a new profile, give it a meaningful name, such as ‘Scan to ScanSnap Folder’
- Set the Application to run as ‘none’.
- Turn off Quick Menu
ScanSnap Manager – Set a Target Folder for your Scans

Click the Browse button to choose a folder that you want your scans to go to.
You can also change the File Name Format on this screen.
ScanSnap Manager – Settings

Because the workflow involves a single page document, I opted for Simplex scanning (single sided) and a fairly low resolution (150 dpi) to keep the file size down.
SnapScan Manager File Options

In the next tab – File Option – I selected ‘.PDF’ for the File Format. There is an Option dialog box here that allows you to set ‘Generate one PDF file per page’. If you are scanning double-sided, you can change the default to 2 pages/PDF.
Profile now appears in the Profile popup

From the Dock select ‘Scan to ScanSnap Folder’, or whatever you named your ScanSnap Profile. To get back to the Settings for Scansnap Manager, hold down the Control Key when selecting the ScanSnap icon from the Dock.
Setting up the Automator Workflow

- Click on the ‘Info’ icon (the small ‘i’ in the top right corner of the main screen in the demo file.
- Save the Workflow file from the Info box in the demo file.
- Open it in Automator.
- Copy the entire script and paste it into a new Folder Action script.
- Set the Target Folder
Launch the Folder Action Workflow

Click the Open with Automator button.
Automator Routine

Here is what the Automator routine does:
- Set the Folder Action to attach it to the folder you are targeting in ScanSnap Manager
- This step captures the path of any new files dropped into the folder. It seems to catch each path individually.
- Set a variable, based on the path
- Gets the variable to feed into the AppleScript
- The AppleScript accepts the variable as an {input}
- The AppleScript then grabs just the name of the file
- It hands the name of the file off to FileMaker using the GetURL command to run a script in FileMaker and pass it the File Name variable
- We go back to the original path statement
- Using that Path we move the file to a ‘Processed’ folder
- Loop causes the workflow to keep going until there are no more files in the folder.
Select All and Copy the entire Automator routine into the clipboard.
Create a New Automator Routine – Folder Action

Select New Automator Workflow and select the type ‘Folder Action’. Paste the script from above into the new Folder Action.
Select a Folder to apply the Folder Actions to

In this case, we will select the ScanSnap Folder on the Desktop.
Edit the FileMaker Version

I work with FileMaker Pro Advanced. When I deploy this solution, it will be running on FileMaker Pro. Set this line of the AppleScript accordingly.
Troubleshooting Tip: When deploying this solution, the location had a copy of FileMaker Pro 11 and FileMaker Pro 13 installed. AppleScript does not seem to have a good method of recognizing the difference between the two. My solution was to zip the FileMaker Pro 11 application to prevent it from opening.
Edit the Folder Action Applescript

Change the variable myDatabaseName to whatever the name of your database is.
Change the variable myDatabaseScript to whatever the name of your import script is. This script in FileMaker Pro must accept a File Name as a parameter.
The Magic Happens Here

What this Automator script is doing is that whenever a new file is added to the target folder (by the ScanSnap scanner, or by dropping the file in the folder), the File Name of the newly added file is handed off to FileMaker via AppleScript, using the ‘FMP’ URL Scheme. FileMaker dutifully performs the script that is called and the parameter that gets passed is the File Name.
This getURL script assumes that the database is open, logged in with the appropriate permissions to run the referenced script.
Advanced Tip: It is possible to embed a user name and password to the script, but that may be seen as a security issue. The syntax is:
FMP://[[account:password@]netaddress]/databasename [?script=scriptname[¶m=scriptparameter][&$variablename=value]]
With a user name and password, the database doesn’t even have to be open to launch FileMaker and run the script. Use hard-coded user name and passwords at your own risk.
Automator Loop Step

Adding this step to the Automator Workflow is what causes the routine to run repeatedly in order to process multiple files at a time. When I first set it up, the default was for ‘Stop after 1 minute’. I noticed that the routine would import about a dozen records and then stop. By pushing the limit to 5 minutes, I was able to handle larger batches of files being dropped into the folder. If you are dropping exceptionally large numbers of files, you may need to move this limit higher. If you are using this primarily with a scanner, 5 minutes should be fine.
Debugging Automator/Applescripts

When an Automator script runs, a small gear icon appears on your top menu bar. To halt a runaway script, click the little x at the right of the popup box.
FileMaker’s ‘Import ScanSnap Document’ Script

This is a fairly basic script, if there is a script parameter (the path), then make a new record and insert the file from the path.
- My configuration is a target folder called ScanSnap on the Desktop. If you want to use a different name or location, edit the $filePath variable, changing ‘ScanSnap’ to ‘<<Whatever your Folder Is Called/>>’. The end slash is important.
- Another important change is to set the Insert File script to the appropriate container field in your solution.
Features of the Automator/Folder Action Approach

- Editable: If something changes in your workflow, it is fairly easy to open it up and change things.
- Flexible: When you get documents from another source than ScanSnap scanner, such as via email or Dropbox, you can still process them using the same routine, ie, drop the files in the folder.
- Tinker-able: Want to add OCR, or file compression? Open the hood, edit the AppleScript and you can build this into the routine.
- Free: Also free.
Cons
- With so many moving parts, this may be inherently breakable. Next OS X release, the entire house of cards could come crashing down. Don’t blame me. Dig into the code and fix it, then send me an update…
The Full Applescript

on run {input} --this gets the file name from the input variable. tell application "Finder" to set myFileName to name of first item of input --debug: if you are having problems, turn on this display dialog --to see what file name you are getting. --display dialog myFileName --setup the database name and script name of the FMP url here: set myDatabaseName to "HB-ScanSnap-Integration-Demo" set myDatabaseScript to "Import_ScanSnap_Document" try --change this to "FileMaker Pro" if that is your target. tell application "FileMaker Pro Advanced" activate --FileMaker 13 supports this type of URL to run a script --inside FileMaker, passing a parameter. --set up your script to accept as a parameter the path of a File. getURL "fmp://$/" & myDatabaseName & "?script=" & myDatabaseScript & "¶m=" & myFileName end tell end try --delay for a few seconds to allow the import to happen in FileMaker. --You may need to adjust this delay if your machine is faster or slower. delay (3) --go back to the Finder to process the next phase of this Automator --action, which is to move the processed file to another folder. --I called mine ScanSnap Processed. -- you could change this last part to move the file to the trash --once you are sure it is working well. -- The Loop at the end of the Automator transaction is to handle --when multiple files are put into the folder rapidly. end run
Workflow Options

The workflow in the demo is sending just the File Name as a parameter. It would make it more modular if instead it sent the entire path, then you wouldn’t have to configure the FileMaker script to reference a particular folder and you could move the folder around to different locations on your drive, without breaking the script. I tried this and it works, sort of, but for some reason instead of just inserting the file, each time it loads a document, you briefly see the Open File dialog. The end result is also that the last step leaves the Open File dialog box open, potentially confusing for the user. There may be a solution to this, but I went with what worked the first time, sending just the file name. If you want to experiment with it, here is the AppleScript code I was using.
Instead of
tell application "Finder" to set myFileName to name of first item of input
I tried:
--get the path from the value of the variable. --set thePath to first item of input as string --convert it from : to / --set myFilePath to the POSIX path of thePath --Then change getURL "fmp://$/" & myDatabaseName & "?script=" & myDatabaseScript & "¶m=" & myFileName --to getURL "fmp://$/" & myDatabaseName & "?script=" & myDatabaseScript & "¶m=" & myFilePath
In the FileMaker Import Document script, change the $filePath variable to Get(SystemDrive) & Get(ScriptParameter), which will be the full path starting at Users/.
Other Approaches

According to my Googling, there are a some other solutions out there for building a paperless office with a scanner and FileMaker Pro.
Free – there is a free app called Snap2FM, which I was not able to get to work. I ended up employing pretty much the same approach as they use, using the FMP URL script protocol, but instead of compiling it into an app, I have created it as an open Automator action which is more editable.
Use a Bigger Fujitsu Scanner – Another solution is called DocKeep from Productive Computing. It starts at $199 and seems to support mostly higher-end departmental and workgroup scanners.
Use a TWAIN Capable Scanner – Combine a TWAIN scanner (Wirecutter’s second choice was this TWAIN capable Canon scanner or a slightly larger Epson scanner.) and a TWAIN plugin for FileMaker Pro. Monkey Bread Software’s do-everything MBS plugin has TWAIN capabilities. Roll your own system.
Windows Alternatives: MIA

I looked for a bit for ways to do this same thing in Windows, but didn’t come up with anything solid. It is possible to send files to a Folder in the ScanSnap software on Windows. But that’s where the automation ends.
3rd Party Tools
There is a simple tool called Folder Actions, but it seems to be a one-step automator. I couldn’t see how it could do what I wanted, calling a FileMaker URL. I also looked at ‘Actions‘ which seems to be End of Life.
Microsoft
I am surprised to see that Windows still doesn’t have an equivalent to Automator built-in. I thought Redmond was good at copying things Apple did. Steve (Ballmer) would never have let this happen.
MonkeyBread/TWAIN option
The MonkeyBread/Twain solution suggested above might be a route to try. This would not work with the Fujitsu scanner, but another similar TWAIN-compliant scanner would work. This route would skip the intermediate folder and just scan directly into FileMaker.
More Resources
I am not much of an Applescripter, but I do know how to copy and paste from Google searches. Here are some resources I looked at and possibly read in the process of writing this blog post.
- An overview of Automator
- Info on AppleScript and POSIX paths here.
- Using Variables in Automator
- Setting up Folder Actions here and also here at Apple’s Mac Developer Library
- Setting up the new Fujitsu ScanSnap software was not the easiest thing I’ve done. There is a decent manual, but it is long. A company called DocumentSnap has written a primer to get you rolling faster.


Douglas,
THANK YOU! The level of specificity in your instructions and your willingness to share everything you’ve done are a gift to us all and THE model to follow for anyone wanting to share “how-to’s.”
Thank you from a very grateful FileMaker community!
Jim Medema
Surefoot Consulting, Inc
Thanks Jim. Nice to know it is appreciated. I have been inspired by many other great bloggers who have come before me (past and present) and the generosity of the FileMaker community in general, but at least a part of the reason I blog this way is as detailed instructions to future me for when I forget how the hell I did something.
An excellent explanation Doug, thank you. And if anyone reading this needs to OCR their scanned documents, take a look at the excellent Reader OCR service that can be integrated directly into FileMaker in minutes: https://www.feedzon.com/products/webservices/reader/
Thanks. I am going to play with your method.
Since probably late 2008 we have been doing something similar and import just under a hundred thousand images a year.
We tried folder actions in the beginning but did not get the results we wanted. It was both an earlier version of FMP as well as earlier operating systems. I see your method as an advantage for the process that we use to upload digital camera images and attach them to a job ticket ticket in a related image table.
— Our current method —
Using ScanSnaps we scan to a folder named “Process” and then import into a container field.
We use an AppleScript to move the folder to the trash and recreate the folder. The variable and AS allow for the system to work without modification for each user. You can also put the folder in your temp directory (set temp to path to temporary items) or other standard location that are user independent.
The script is:
Set Variable [$process; Get ( DesktopPath ) & “process/”]
Move/resize window [Current Window…]
Go to Layout [“work_list_documents” (work_list_documents)]
Import Records [No dialog; $process; Pictures and movie files; Add; Mac Roman]
Perform Applescript [below]
Go to Record/Request/Page [First] — so operator can see their scan
The AppleScript to reset the process folder is:
set DT to path to desktop folder as string
set myFolder to DT & “process”
tell application “Finder”
move folder myFolder to trash
make new folder at desktop with properties {name:”process”}
end tell
Just got my Fujitsu S1300i yesterday! Imagine my surprise to see this! Perfect timing doesn’t even cover it.
Thanks Doug!
Takes a lot of hassle oft of scanning sessions!