

 September 10, 2012
2018-08-16 Update
Reader Tim Fox from Miami pointed out that this demo file wasn’t working any more. I have updated it to FM12 format and edited the Automator routine a bit to make it a little faster and smoother running. If you have already attempted to use this and are re-downloading the file, please delete the Automator routine called “Take Photo With Automator.app” from your system first and then re-download it from within the FileMaker demo file.
Security Changes
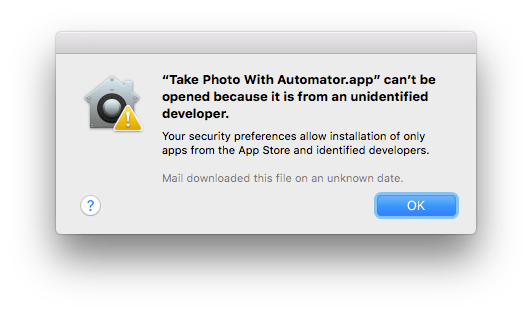
Things have changed in the Macintosh world, with Apple tightening up on security around downloaded apps, which includes Automator apps. You will probably need to expressly give the Automator routine permission to run the first time you try to launch it. This is done in the System Preferences: Security & Privacy Panel. Click on the ‘Open Anyway’ button.
It is always advisable to review the steps of an Automator routine first to make sure it is not doing anything you don’t want to your system.
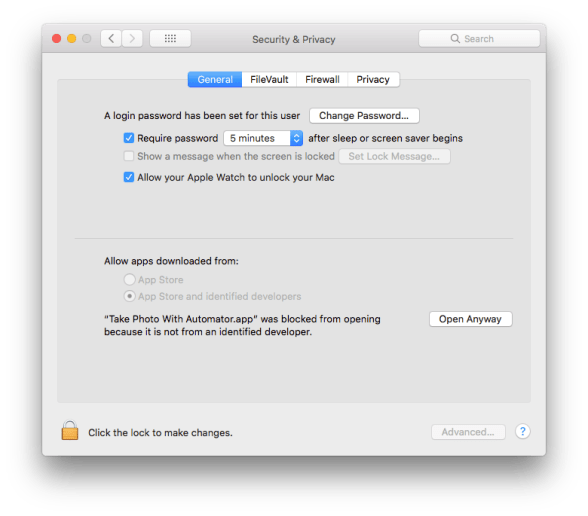
Image File Name
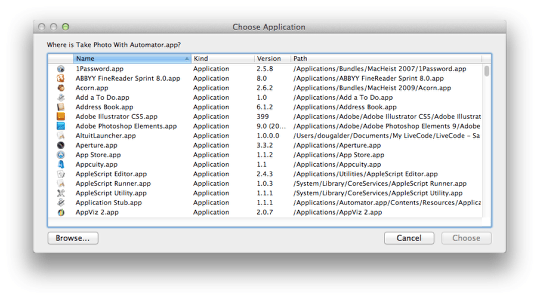
One more thing of note, if you decide to change the $FileNameBase variable in the FileMaker script, you will need to edit this in the Automator app as well. To do this, first launch Automator (it is on all modern Mac systems) and use ‘File Open’ from the menu. Select ‘Take Photo With Automator.app’ and edit the name in the first step.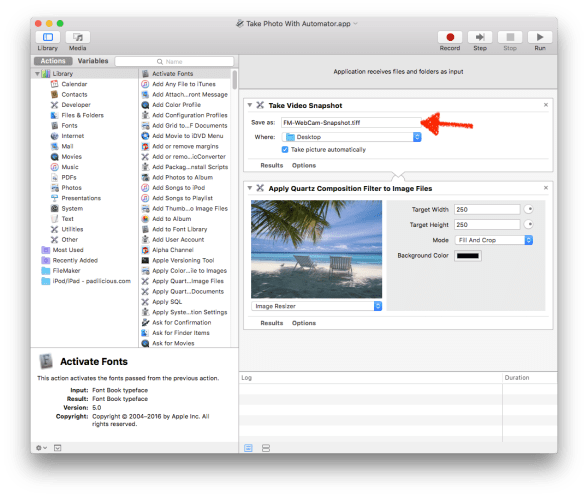
A final heads up, this routine is not a quick one to run. It chugs. It would be great if FileMaker Inc., were to add the ability to snap images from a web cam into their desktop versions. This ability has been in FileMaker Go on iOS since the first version I believe. Alternatively, a nice affordable plugin from the FileMaker 3rd party developer community would be awesome. Perhaps with Mac OS 12’s (Mohave) new Continuity feature will be scriptable or work from within a FileMaker container field.
Original Article
I went looking for a way to capture photos from a webcam into a FileMaker container field on a Macintosh. The plugin options were not as good as I thought they might be, but there was a happy ending to my search. I came up with a free way to snap photos right into FileMaker Pro.
Download Demo File
I have a solution called PassTracker that keeps track of member activity at climbing gyms. A while back I integrated a USB camera to take customer photos. I was employing an AppleScript that sends a request to a third-party program called Periscope from Freeverse. Recently Periscope started to load very slowly, so my customers asked for a fix. Looking for an upgrade, it appears Freeverse doesn’t list Periscope on their web site anymore, so I have to assume it is no longer being supported.
The Periscope solution had never been the ideal for PassTracker as the external interface with its detailed control of the webcam was overkill for my users. It seems to me a bit strange that FileMaker Go running on iOS has built-in image capture capability and every laptop and all-in-one computers sold in the last five years has some kind of camera built-in, but FileMaker Inc. has not added a video capture capability to FileMaker Pro yet. Another feature for FileMaker 13 perhaps?
I looked on the internet for webcam capture plugins for FileMaker. I only found two: Troi Grabber and VideoRaptor.
My past experience with Troi’s software has been good—they create plugins that are both affordable and well behaved. In this case however the price tag was too high for my solution. For some reason Troi charges $1,049 for a developer license and they don’t sell individual licenses.
I didn’t have much success getting VideoRaptor’s plugin running. At first I got errors saying there was no license code installed, but it hadn’t asked for that on loading. Once I installed a trial license, the plugin came back with more errors saying something about an upgrade. VideoRaptor has a low price ($27), but I was not able to get it working. Apparently a new version is in the works, so it may be worth revisiting.
Automator to the Rescue
I researched some more and came across an article on TUAW.com about using Automator to snap a photo. It turns out there is a nice little step built into Automator to snap a photo with your webcam. Automator is an automation utility that is available on all current Mac OS X computers.
FileMaker calls the Automator Routine
With that knowledge in hand, I turned to FileMaker to generate a script that would launch the Automator routine, wait for a set period while the photo was taken and then import the resulting image from the Desktop into FileMaker Pro.
Automator routine to grab an image from a USB Camera attached to your Mac.

The three steps I used in the Automator routine are:
- Take Video Snapshot
- Apply Quartz Composition Filter to Image Files
- Change Type of Images
The Automator script can be as fancy or as simple as you like.
1) The simplest would just be use the first step, take a photo. I added two more steps to make the image smaller.
2) The first additional step shrinks the image dimensions down to 250 x 250. Using the Fill and Crop mode keeps the aspect ratio correct.
3) The second step I added changes the file format to JPG. The default output of the first step seems to be TIFF. I tried putting ‘.jpg’ at the end, but the result of the capture was a TIFF file. TIFF being an uncompressed file format is not going to be as compact in your database. I was able to drop the file size from 190 kb to 19 kb, one tenth of the size by using these two additional steps, so it is probably worth adding some kind of additional processing at this point to preserve space if image quality is not paramount.
The Demo file – How it works
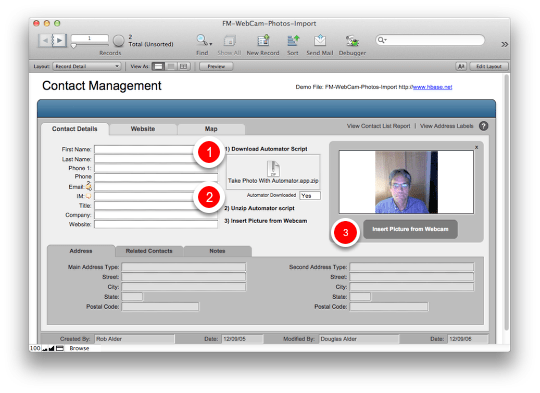
When you first launch the demo, download the Automator routine to your computer.
- Click on the ‘Take Photo with Automator’ icon. This should prompt you to download and save the Automator routine to your computer. It could be on the Desktop, in your Documents folder, or even in you FileMaker Extensions folder.
- Make sure you unzip the file if it doesn’t automatically do so.
- Next, click the Insert Picture from Webcam button.
First Run Error
If you see this screen, you forgot to unzip the downloaded application. You will need to unzip the Automator application and restart FileMaker Pro to get it working correctly. Once the Automator file is unzipped, the Insert Photo from Webcam script should work.
Automator’s camera prompt
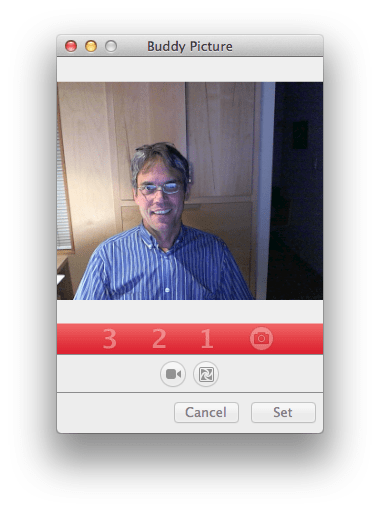
If everything is working correctly, you should see a camera countdown and the screen will flash as it takes your photo.
If you have any problems with the downloaded version of the Automator routine, make sure that you are running on a Macintosh with OS X, the Automator app has been downloaded AND unzipped somewhere on your computer. If you are seeing error messages, relaunch FileMaker and try the Import button again.
To edit the file in Automator, launch Automator use the File Open command to get access to the steps in the app. Try recreating the steps above or customizing them to your needs. If you change the name of the Automator routine, make sure you update the references in Applescripts that FileMaker Pro calls. Automator uses Apple Events to call the App and if it doesn’t show up in the list of Applications, the routine may choke.
The Scripts that Matter
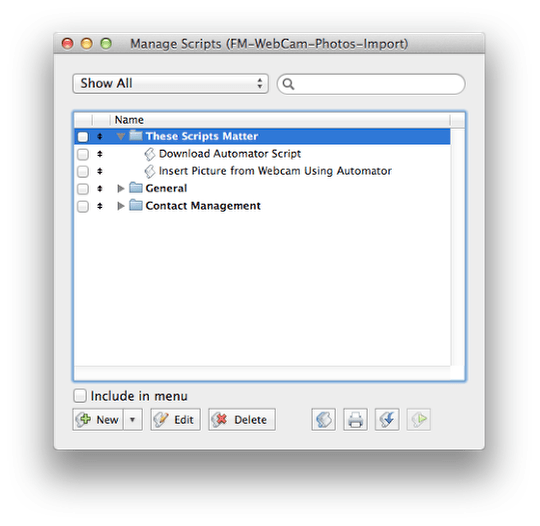
This file is a modified Contact Management file from FileMaker’s built-in Templates. There are only two important scripts in a folder appropriately named ‘These Scripts Matter’.
‘Insert Picture from Webcam Using Automator’ script.
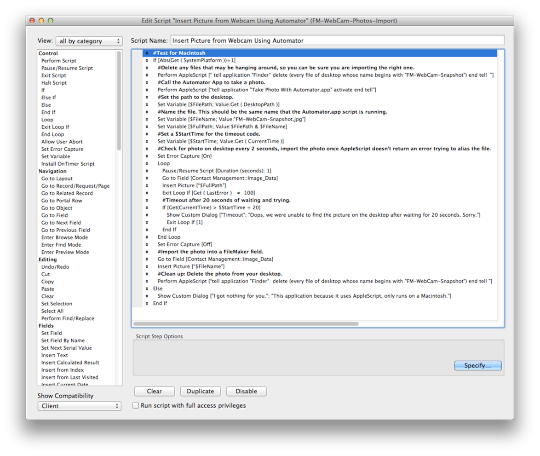
Insert Picture from Webcam Using Automator
#Test for Macintosh
If [ Abs(Get ( SystemPlatform ))=1 ]
#Delete any files that may be hanging around, so you can be sure you are importing the right one.
Perform AppleScript [ Native AppleScript: tell application “Finder” delete (every file of desktop whose name begins with “FM-WebCam-Snapshot”) end tell]
#Call the Automator App to take a photo.
Perform AppleScript [ Native AppleScript: tell application “Take Photo With Automator.app” activate end tell ]
#Set the path to the desktop.
Set Variable [ $FilePath; Value:Get ( DesktopPath ) ]
#Name the file. This should be the same name that the Automator.app script is running.
Set Variable [ $FileName; Value:”FM-WebCam-Snapshot.jpg” ]
Set Variable [ $FullPath; Value:$FilePath & $FileName ]
#Set a $StartTime for the timeout code.
Set Variable [ $StartTime; Value:Get ( CurrentTime ) ]
#Check for photo on desktop every 2 seconds, import the photo once AppleScript doesn’t return an error trying to alias the file.
Set Error Capture [ On ]
Loop
Pause/Resume Script [ Duration (seconds): 1 ]
Go to Field [ Contact Management::Image_Data ]
Insert Picture [ “imagemac:$FullPath” ]
ExitLoopIf[Get(LastError) ≠ 100]
#Timeout after 20 seconds of waiting and trying.
If [ Get(CurrentTime) > $StartTime + 20 ]
Show Custom Dialog [ Title: “Timeout”; Message: “Oops, we were unable to find the picture on the desktop after waiting for 20 seconds. Sorry.”; Buttons: “OK”]
Exit Loop If [ 1 ]
End If
End Loop
Set Error Capture [ Off ]
#Import the photo into a FileMaker field.
Go to Field [ Contact Management::Image_Data ]
Insert Picture [ “image:$FilePath/$FileName” ]
#Clean up: Delete the photo from your desktop.
Perform AppleScript [ Native AppleScript: tell application “Finder” delete (every file of desktop whose name begins with “FM-WebCam-Snapshot”) end tell ]
Else
Show Custom Dialog [ Title: “I got nothing for you.”; Message: “This application because it uses AppleScript, only runs on a Macintosh.”; Buttons: “Do’h” ]
End If
Notes: If you change the name of the Automator app, please update the references in the Perform AppleScript steps. Thanks to Rob Alder for improving this script for me.
Dealing with a USB Camera that is NOT a built-in iSight
In the end, the Automator approach didn’t work in my solution. Things all worked fine on my development machine. In my office, I use a MacBook Pro setup in a Henge Dock (I love it, thanks for asking). This means that the MacBook’s lid is closed and the computer is plugged into an external monitor, so the iSight camera is blocked. For Skype calls etc, I use a Logitech HD camera. Fortunately, the Automator routine was smart enough to figure out that the iSight was offline and defaulted to using the Logitech camera.
When I ran the Automator app with my client’s system, things did not go so smoothly. In the gym, they have an iMac facing the staff and a USB camera plugged into it facing the customers. I needed the Automator routine to run using the outward facing USB camera. The Automator routine was getting confused because there are two cameras running, the built-in iSight and a separate USB webcam. Of course it defaulted to the iSight and there is no configuration Control Panel to tell it different. (Where is the Camera control panel Apple? There is one for Audio, how about a Video control panel?) In order to disable the iSight camera I found a set of Terminal commands to remove the iSight drivers, so that the Automator routine would default to the USB webcam instead. Sadly, the Dynex USB camera didn’t show up as when the iSight went offline.
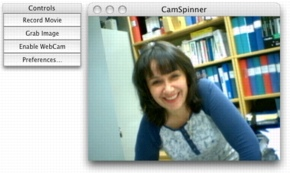
I went searching for another solution and found an inexpensive ($12.95) AppleScript-able webcam app with a very simple interface called CamSpinner. The structure of the script is very similar. I had to setup CamSpinner’s preferences, select the USB webcam as the default camera and set a default file name for when it takes a photo. The major difference is the AppleScript call to CamSpinner looks like this:
tell application “CamSpinner”
activate
delay (2)
set theFile to grab
quit
end tell
try
tell application “Finder”
delay (2)
set the name of (every file of desktop whose name contains “PTSnapshot”) to “PassTracker Snapshot.jpg”
end tell
end try


Reblogged this on Sutoprise Avenue, A SutoCom Source.
Very thorough, Douglas. Thanks for the post. I wonder if the new remote container fields in FMP along with the strategic move to place FM GO as an app builder will make automatically entering audio/visual media a little more seamless.
In any case, your experimentation and documentation are appreciated!
Very Nice! I too followed that path with the same software. I am trying to put together a cataloging application for a product catalog using a tethered DSLR camera. I use Adobe Lightroom and Apples Aperture. I would like to print out High Resolution Quotes or Product sheets of my products. Since I have over 2500+ items and with more coming every day, I would like to automate the image capture and streamline workflow. I am also interested in DAM and really like the http://www.elvisDAM.com which has many great features but is to expensive for small business. Filemaker should be able to create a low cost version for DAMM
Hey, This really helped a lot.
Converted the FP7 to FP12 and it worked perfectly. Thanks!
Really opens my eyes to the interactive possibilities of Filemaker.
I have the latest FMP 12 with update and latest OS X Maverick and all work fine but the script to start the Automator is not working. Getting the error -43 and the script is waiting for a picture. So I start the automator myself and I get a picture, then the script end up perfectly. Any solution?
Hi Martin. I looked up FileMaker Error Codes and there does not seem to be an error -43 in their list. (http://www.filemaker.com/help/html/error_codes.html) I could not find a source of Automator error codes in my brief search. One thing to try would be to restart your computer and try again. Another suggestion would be to rebuild the Automator script on your own computer, re-save it with the same name to see if that works. I am not seeing this behaviour in FM 11 on my machine.