
 September 30, 2013
Recently I attended a FileMaker UI/UX Masterclass (UI = User Interface, UX = User Experience) session put on by FileMaker Canada in Vancouver. The session’s main presenter was Yann Liqueur-Salzédo from Infografix in Nice, France. Yann’s innovative design work wowed the crowd at the 2012 FileMaker DevCon in Florida. He has recently launched a web site that aims to provide design inspiration to FileMaker Developers at FileMakerUI.com. The web site is just getting started, but is worth a look to check it out for some ideas.
As is sometimes the case, one of the gems of this session came out of the question period at the end of the session—Yann was prompted to ‘pop the hood’ on one of his demos and reveal one of his interface tricks—the use of a hidden tab panel to hide and show interface elements on the display. This technique is especially useful when space is at a premium, for instance in a iPhone or iPad interface, or where a large number of alternatives have to be presented in a compact manner.
This technique has been out there for a while (Digital Fusion and Mighty Data), and could probably be employed with previous versions of FileMaker Pro, but FileMaker Pro 12 makes it especially useful because the way it handles objects inside of a tab panel.
Pick Lists can also be done by popping up a new window with a list on it, but there is a certain elegance to displaying the selection component right on the existing window. Using small graphic elements, you can point to the field the data is meant to enter.
Not sold on it yet? One comment I received about this technique was that it was ‘too much work’. It really rocks with iPhone apps where screen real estate is tight and for improved usability, you want to stay on the same screen.
In the UI/UX Session, Yann used the technique to hide/ show his own custom keyboard and numerical pads to avoid the hot mess that FileMaker for iOS can display when clicking into a field. He also uses it to reveal beautiful pick lists designed with custom fonts and icons.
Here is my attempt to ‘steal’ Yann’s design ideas and demonstrate a much simplified version of his technique with two hidden panels (I believe his had over a dozen hidden tabs in his iPhone layout).
Download Demo file.
Click into a field to reveal a Pick List

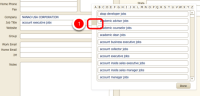
1) clicking into the Company field will display a context appropriate pick list of companies
2) The number of companies is large (2500) and would not be appropriate for a regular FileMaker pop up list.
Display lengthy Pick Lists, using a set of alphabetical filter buttons along the top of the screen

Using a set of alphabetical buttons, allows the user to filter on a company name quickly.
1) click letter
2) scroll through the filtered list
3) click on name to enter data.
The alphabetic buttons could be replaced with a global field filtering the portal instead, so that a user could type the first few letters of a company name and drill down on the list. The idea is just to find ways to get the user to their destination faster.
Click on a Company Name to select that data and enter it in the Company Name field

Once a name is selected, the tab panel is hidden again.
Click into a Job Title field and get a similar lengthy pick list for Job Titles.

Using the same technique, a second hidden tab panel displays, clicking on Job Title brings up a long list (over 2,700) of possible Job Titles.
1) note the small graphic element indicating which field that the selection will be sent to.
Click on letter of the alphabet to filter list

1) click on letter to filter
2) filtered list of Job Titles displayed
3) click on Job Title to set the field.
Click on Job Title in Pick List to select that job title for the Contact

Behind the scenes — invisible tab panels

With the tab panel displayed, (click into one of the fields for Company or Job Title), switch to Layout Mode to see the Tab Panel displayed.
Tab Control Setup — Tab Width set to Fixed Width of 0 points

Double click on the Tab Panel to bring up the Tab Control Setup.
1) Note that the Tab Width is set to a Fixed Width of 0 points.
2) There are three tab panels, Nothing (the hidden view), Companies List and Job Titles list.
To work with the panels, set the Tab Width to Label Width

To make selecting the tab simpler to work with, change the Tab Width pop up to Label Width and click OK. When you have completed setting up your pick lists, you can reset it back to Tab Width zero pixels wide.
Now the panels display and you can click on them to see what is inside them

The Tab Panel names are now displayed along the top of the Panel. The Nothing panel should remain empty. The other panels you can put whatever you want to display, based on some user action.
Name each Tab Panel with a meaningful and unique name

Like your children, give each tab panel a meaningful and unique name because you need to be able to call them.
Format the panels to display with a solid background

In order to hide and display the tab panels, in addition to the 0 point Tab Width, it is a good idea to turn on and off background Colors. For Tab Panels you want the user to see, turn on a solid background. This is done by selecting the appropriate tab panel and then modifying its Graphic Appearance in the Inspector (Command I on a Mac or Control I on Windows)
Format the hidden panel with no fill or line

With the hidden panel, set the fill to None and the line to None.
Displaying the Tab Panel with a Script Trigger

To get the popup Tab Panel to display, set a Script Trigger to run a script OnObject Enter. Right click on the field and select ‘Set Script Triggers…”
OnObject Enter triggers the display of the panel

This script calls also needs a script parameter — “Select Company Selection Tab”
Select Company script

In the Scripts Menu select “Manage Scripts”
Display Tab Panel script – displays panel and sets selected value to field

Select Company Selection Tab displays the Tab Panel and sets the filter field to ‘A’ as a starting place for a search.
If [Get(ScriptParameter)=”Select Company Selection Tab”]
Go to Object [Object Name: : “CompanyNamesTab”]
Set Field [Contacts::gFilterOnFirstLetter[]; “A”]
Halt Script
End If
The other part of the script is involved with selecting a company from the pick list and setting the field in the main interface.
If [Get(ScriptParameter)=”Select Company”]
Set Field [Contacts::ID_Company[]; Contacts_COMPANIES~_One::ID_Company]
Set Field [Contacts::Company[]; Contacts_COMPANIES~_One::Company Name]
Go to Object [Object Name: : “NothingTab”]
Halt Script
End If
Setting the field to the selected option from the Pick List

The two display fields are set in the Inspector to have no field entry in either Find or Browse mode. They are then set to be buttons with the script parameter of “Select Company”
When you are done setting up your interface elements, set the Tab Panel Width back to 0 points

More ideas
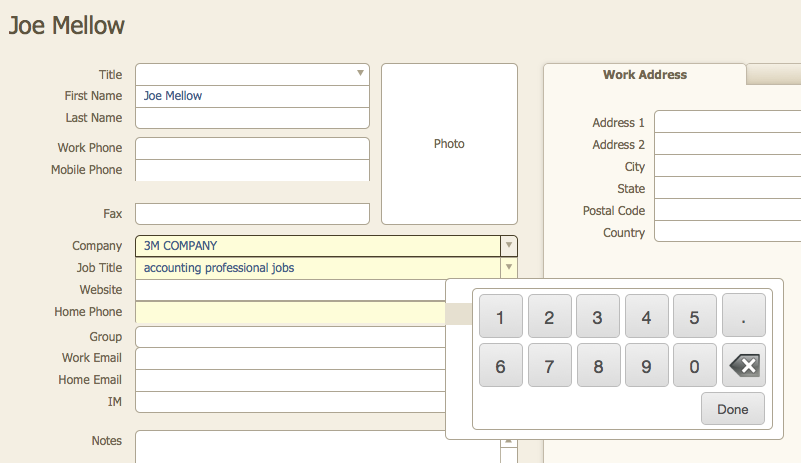
There are some other techniques going on in the demo (I added a Type Ahead search for Companies and a numeric keyboard example for iOS use) that you can explore, but the main focus of this post was to show the basics of creating a hidden tab panel to display complex interface elements in the appropriate context.
I hope this technique is useful in your development. I was inspired on seeing it demonstrated and plan to employ it in some new and improved customer interfaces. Drop me a line with any interesting variations you would like to share.


Brilliant article, and a original and creative way to use this hidden tap panels ideas
That was really good to me, until I noted that background field are still selectable, so that if you click where nothing is on the front but a field is hidden in background you edit that field !
This is a terrible font of dangerous effects, I think
True, there are some limitations. In the example I am using, it is designed for quick data entry and so all the fields could potentially be locked, only allowing data entry through the popup lists.