I was recently asked by a client about how to set up a record locking system. The idea of record locking is that when some event happens a record becomes no longer editable, preserving the contents from change. I have used two different strategies for record locking before and they are both useful, depending upon the business case.
Two strategies:
1) Lock the entire record from deletion and editing by employing a customized privilege set and a field for tagging the records to lock. Related table records can be locked as well.
- Pro: Simple, few moving parts.
- Con: Less flexible
2) Rather than locking an entire record, instead lock specific fields while still allowing some fields to still be edited. The lock field and privilege set are still employed, but in addition each field you wish to protect has a validation calculation attached to it.
- Pro: More flexible
- Con: More field definitions to modify.
Demo file

Four User Accounts are defined:
- Admin
- Manager
- User
- Data Entry
All have no password, just enter the Account Name and leave the password field blank.
- The User account demonstrates the record locking approach
- The Data Entry account demonstrates the field locking approach
- The Manager and Admin accounts can run the Lock Record script.
1) Simple Record Locking Approach

Add a text field called “Locked” and a Lock Icon calculated container field. The Lock Icon technique employed in the demo is FileMaker Pro 13 only. If you are working with an earlier version, substitute the Base64 Encoded text with links to a set of global icon fields, or omit the icon and simply use the text field ‘Locked’.

Create a new privilege set in the File Menu: Manage > Security…

Create a new Privilege Set called “User”. I did this by selecting the default Data Entry Only and clicking Duplicate. FileMaker Pro prevents you from modifying any of its core example privilege sets, although you can render them inactive by not assigning any users to them.

- Name the new privilege set something meaningful
- Give it a description.
- Then go to the Records area
- Select ‘Custom Privileges…’ under the Records pop up.

Records can be Edited (or Deleted) when the field Locked ≠ “Locked”

Finally, you need to assign a user or users to use this new privilege set. Go back to the Users tab, still in the Security area. Select a user and set the Account User to the Privilege Set “User”.

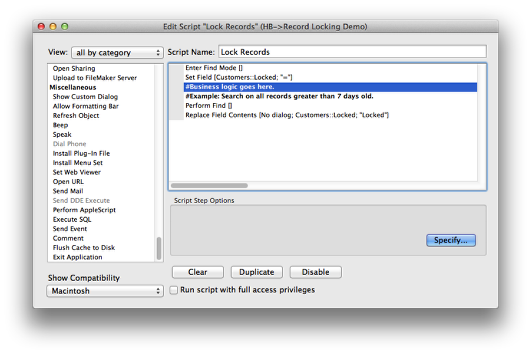
Record Locking script
- Test for PrivilegeSetName “Manager” or “Full Access”
- Then allow the script to proceed
- If the Locked field is empty, set it to Locked, if is equal to Locked, set it to Empty.
- Most importantly, click toggle for “Run script with Full Access privileges”

Lock field and Lock Icon setup
- Turn off data entry in Browse Mode. Leave it on in Find Mode so you can still search on records that are locked or unlocked.
- Set the Lock Icon field to be a button to the script “Toggle Record Lock”.
- Toggle Lock On, Toggle Lock Off.
That is the basic set up. To test this in the Demo file: log in first as a Manager or Admin. Click on the Lock icon on one or more records. Once the record is locked, try editing any of the fields. You should see an error message asking you to revert to the previous value in the field. As Manager or Admin, you are able to toggle the lock icon. Now log in as User and try editing or locking a record. In both instances, you will be locked out and receive an error message. That is Record Locking.
2) Locking Specific Fields

In this scenario, which uses much of the same infrastructure as above, except that we don’t lock the entire record and prevent deletion and modification based on the status of the Locked field.
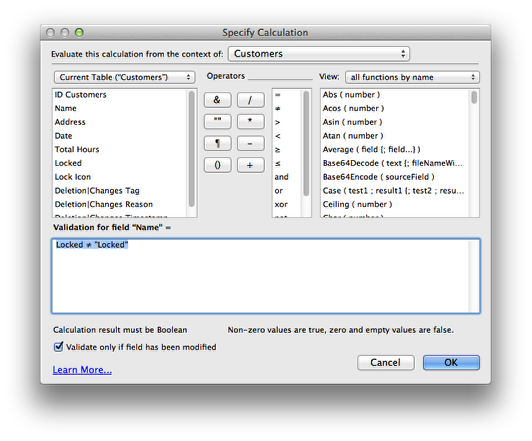
Instead of locking the entire record via a Privilege Set, instead we lock individual fields using Validation criteria. The way to do this is to go into the Field Definitions of the fields you wish to restrict:
- Go to the Validation tab
- Set the “Allow user to override during data entry” option to off
- Set the “Validated by calculation” to on (see next step for exact definition).
- Enter a Custom Message if validation fails to help the user understand what is happening.

The validation criteria for each of the fields you wish to lock down, each field should look something like:
Locked ≠"Locked"
Note: It is also possible to lock related records using this same technique. Look in the Demo file for details on how this is done. In the field definition for whichever fields are to be secured, it will look something like this:
Customers::Locked ≠ "Locked"
The related record is referencing the Locked field in the table above it.

It is also probably a good idea to lock the Data Entry user out of the ability to delete records in the table you are working on. It is one thing to not be able to modify the record, but if the user can still delete the record, field locking is not as useful.
Using a similar approach as above, where we created the ‘User’ privilege set, ‘Data Entry’ is a duplicate of the ‘Data Entry Only’ default set, that has been modified to only allow Create and Edit in all tables. I have set the Data Entry account to use this modified Data Entry privilege set.
Locking Records or Locking Specified Fields Scripting

To test the field locking, again log into the demo file as Admin or Manager. Lock a record. Now log in as Data Entry. Note that you can still enter data into the fields at the bottom of the main Customers layout that are designed for Deletion|Changes tagging. You should still be able to edit the above fields, but not the fields with Validation turned on, and you won’t be able to lock/unlock records or delete records.
Scripting the Lock Records Process
How and when should the record locking take place are questions you will have to answer for your own solutions. Ultimately this is where the business logic of an individual solution will come into play. If the records are to be locked automatically after a defined period, server side scripting after business hours to avoid interfering with any in-use records is probably the best option. I have left this scripting out of the demo, because it is likely to be very particular to your solution.
Some options:
- Immediately upon Exiting or Saving the record—use a Script Trigger
- After a certain number of days, run a script that searches for all unlocked records older than x days—Script, On Open/On Close/On Server
- Manually locked by a manager when project is completed—Script
Related Articles
Soliant Consulting: Easy FileMaker modal edit dialogs with full rollback support


 February 14, 2014


Record locking can be a valuable feature to an administrator. Excellent tutorial and I look forward to using this method.
Great tutorial and demo on record and field locking.